Imagine having an AI-powered assistant on your website that knows everything about your business. What if it could chat with your visitors just like a normal person, answering all their questions and providing information about products, order status, and expected delivery times? Sounds almost magical, right? Unlike a real person, this AI chatbot can be active 24/7, replying to your customers instantly without you needing to lift a finger.
You might think adding an AI chatbot must be complex and expensive, but it’s simpler than you think. This guide will walk you through a step-by-step process to add an AI chatbot to your WordPress site.
How To Setup ChatBot
Step 1: Create an Account on Tidio
To get started, you’ll first need to create an account on Tidio, a platform that allows you to build your AI chatbot.

- Go to the Tidio Website and create an account
- Click on “Get Started Now.”
- Enter your email address and set a password.
- Provide the URL of your website where you want to add the chatbot. If you don’t have a website yet, you can check out tutorials on creating one in under 10 minutes.
- Agree to the terms and click “Get Started.”
Once you complete these steps, Tidio will ask for some additional details to finalize your account setup. After that, select the AI support agent option and click “Let’s Go.”
Step 2: Set Up Your Chatbot
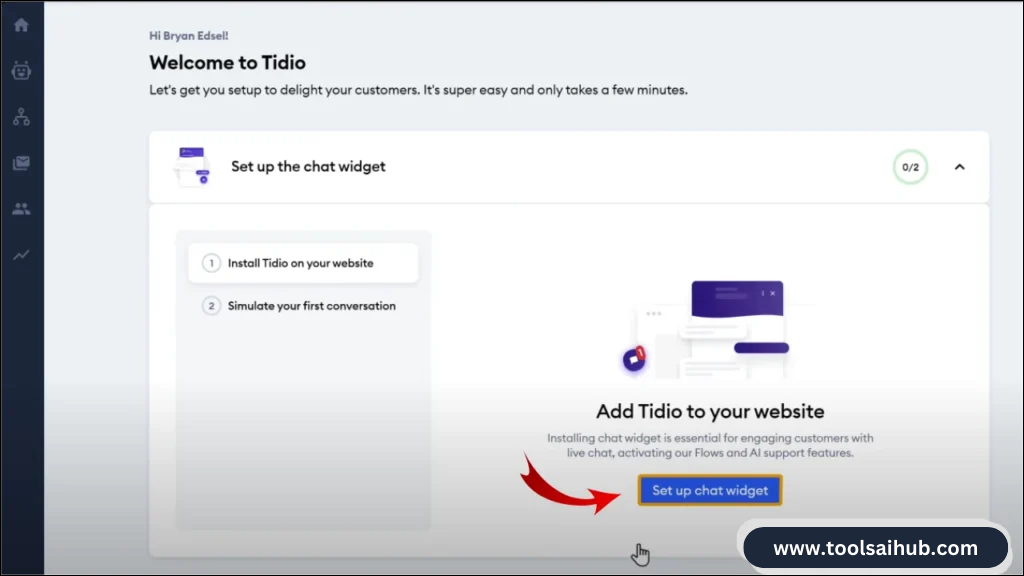
With your Tidio account created, the next step is to set up your chatbot. Follow these steps:
- Scroll down in your Tidio dashboard and click on the setup option for your chatbot.
- Customize the appearance of your chatbot, including its name and image. For example, you can name your chatbot “Rachel” and upload a suitable image.
- Change the color of the chatbot to match your website’s theme.
- Once you’re happy with the design, click “Continue.”
- Select WordPress as your platform for installation. Tidio provides step-by-step instructions tailored to your platform.
Step 3: Add the Chatbot to Your Website
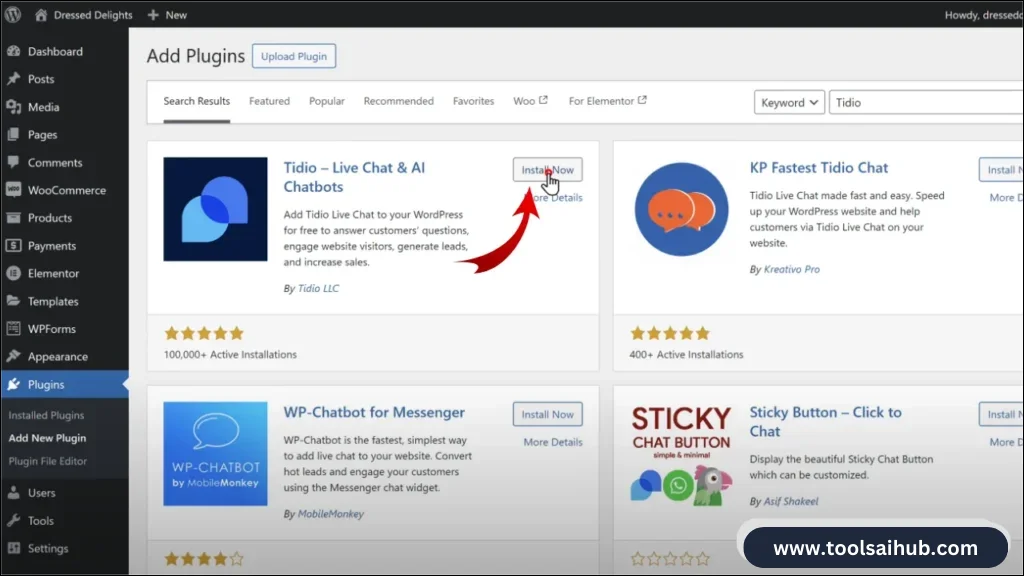
Now it’s time to add the chatbot to your WordPress site.
- Log into your WordPress dashboard.
- Navigate to “Plugins” and click “Add New.”
- Search for “Tidio” and click “Install” followed by “Activate.”
- After the plugin is activated, go to Tidio Chat and log into your account.
- Select your project from the list and click “Integrate Selected Project.”
- Approve the integration request to allow Tidio to display your products.
Once these steps are completed, you can check your website, and you should see the chatbot widget at the bottom right corner of the page.
Step 4: Train Your AI Chatbot
At this point, your AI chatbot is live on your site, but it might not be able to answer visitor queries effectively. To improve its performance, you’ll need to train it.
- In your Tidio dashboard, click on the setup option for the AI chatbot.
- Enter links to your website pages so the AI can learn from the content. Copy the URLs of your pages and paste them into the training section.
- Once you’ve added all relevant links, click “Upload.”
As the AI processes the links, you’ll see a status indicating that training is in progress. When it changes to “used,” your chatbot is trained and ready to assist visitors.
Testing Your AI Chatbot
After training, it’s time to test your chatbot’s functionality:
- Go back to your website and click on the chatbot icon.
- Enter your email address and ask a question, such as “Do you have any hoodies available in medium size?”
If the response is satisfactory, such as showing the available products and links, then your chatbot is working well. You can also ask about stock levels or restocking frequency, and the AI should provide accurate responses.
Handling Unanswered Questions
Sometimes, the chatbot may not have enough information to answer specific queries. In such cases, it will offer an option for visitors to chat with a real person. When this happens:
- You’ll receive a notification in your Tidio panel about the unanswered question.
- Click on the notification, and you can join the conversation to provide a personal response.
Using the Tidio Mobile App
You can also manage chats on the go with the Tidio mobile app, available for both Android and iOS. Here’s how:
- Download the Tidio app from your device’s app store.
- Log in with your Tidio account credentials.
- You’ll receive notifications whenever a visitor wants to chat, allowing you to respond directly from your phone.
Training Your Chatbot for FAQs
If multiple visitors ask similar questions, you can enhance your chatbot’s knowledge by training it to answer frequently asked questions (FAQs). Here’s how:
- Go back to your Tidio dashboard and click on the “Data Sources” option.
- Add FAQs manually by entering the question and the corresponding answer, then click “Save.”
- Repeat this process for any other questions you want the chatbot to learn.
Now, when visitors ask these questions, the chatbot should provide accurate answers based on the training you’ve given it.
Upgrading Your Tidio Plan
The free plan offers up to 50 responses from the AI, along with technical support via email. However, if you want to remove Tidio branding and access additional features, consider upgrading your plan.
- Go back to your Tidio panel and click on “Upgrade.”
- Choose the AI agent plan that suits your needs.
- For a limited time, you can receive a 20% discount on your total price by using the link in the description.
Conclusion
Adding an AI chatbot to your website can greatly enhance customer support and engagement. With Tidio, you can set up a powerful chatbot in just a few simple steps. By training it effectively and utilizing the mobile app, you can ensure that your visitors receive the assistance they need, anytime and anywhere. So what are you waiting for? Start using Tidio today and take your customer support to the next level!